将搭载 OpenWRT 的路由器当作 AP 使用
Table of Contents
配网入门
搬寝室以后舍友给我们一人分了一个 VLAN,上游给了 DHCP。为了使用宿舍的资源,需要将路由器配为 AP 模式。
Environment:
- OS: OpenWrt 18.06.2 r7676-cddd7b4c77 with LuCI openwrt-18.06 branch (git-19.020.41695-6f6641d)
- Wireless Router: Netgear Nighthawk X4 R7500v2 Original
顺便翻译一下 OpenWRT wiki 上的东西:
Configuration via Web Interface LUCI
Of course you can achieve this with using the web interface:
Once you have configured your wireless network with LUCI you can start configuring your dumb AP.
1. Disconnect the (soon-to-be) Dumb AP from your network, and connect your computer to it with an Ethernet cable.
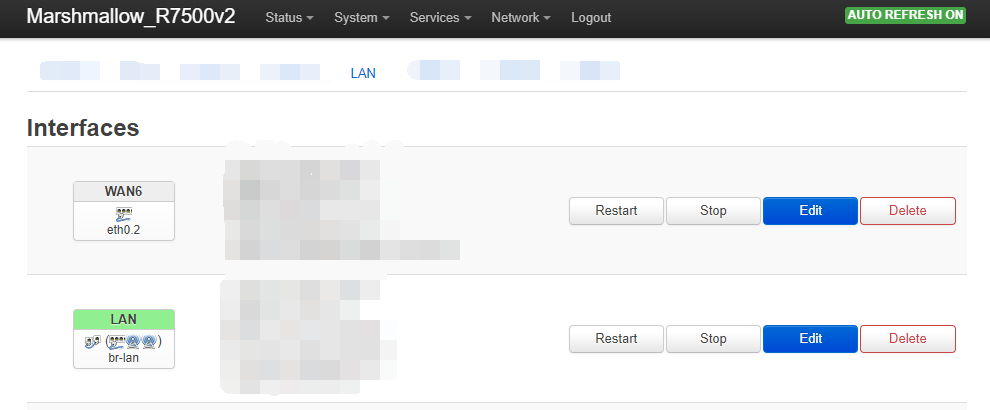
2. Use the web interface to go to Network → Interfaces and select the LAN interface.
3. Enter an IP address “next to” your main router on the field “IPv4 address”. (If your main router has IP 192.168.1.1, enter 192.168.1.2). Set DNS and gateway to point into your main router to enable internet access for the dumb AP itself.
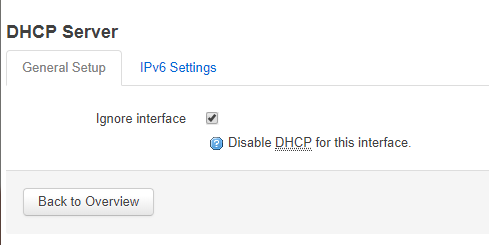
4. Then scroll down and select the checkbox “Ignore interface: Disable DHCP for this interface.”
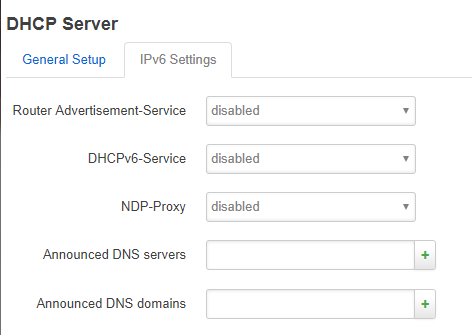
5. Click “IPv6 Settings” tab and set everything to “disabled”.
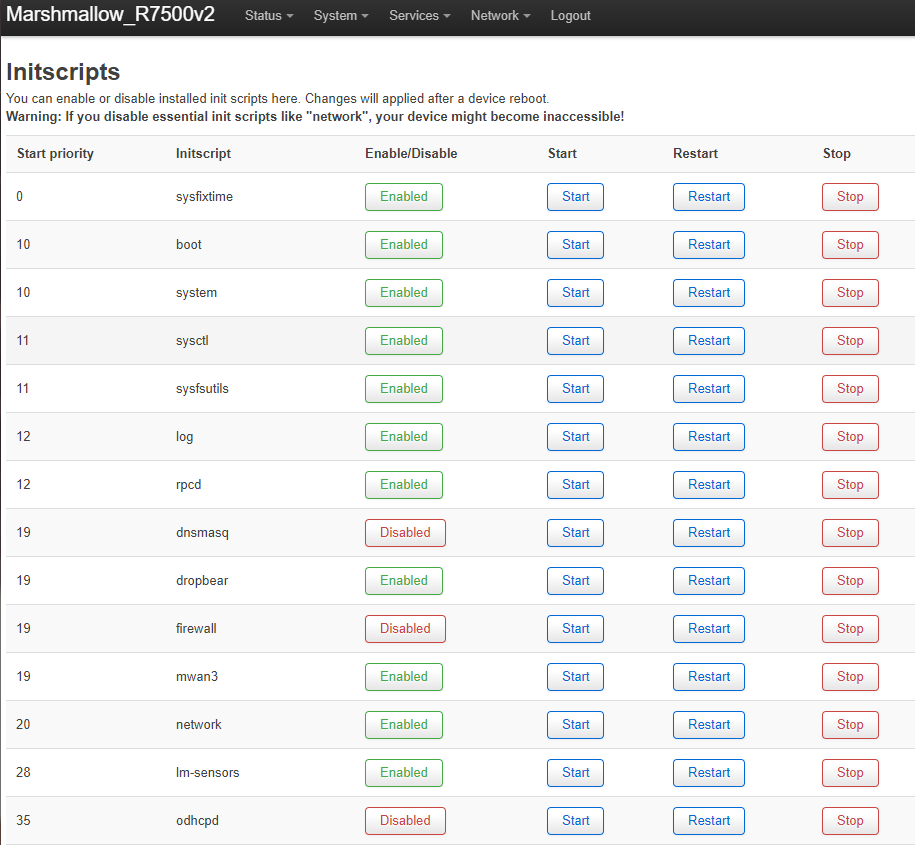
6. In the top menu go to System → Startup, and disable firewall, dnsmasq and odhcpd in the list of startup scripts.
7. Click the Save and Apply button. Hard-Restart your router if you’re not able to connect anymore.
8. Go to http://192.168.1.2 (or whatever address you specified) and check if the settings for the <abbr title="Local Area Network">LAN</abbr> interface are the same.9. Use an Ethernet to connect one of the <abbr title="Local Area Network">LAN</abbr> ports on your main router to one of the <abbr title="Local Area Network">LAN</abbr>/switch ports of your “new” dumb AP. (There's no need to connect the WAN port of the Dumb AP.)
10. You are done.
利用LUCI来配置:
你当然可以用网络界面(LUCI,以下这个短语都按照LUCI来翻译)来配置(使得你的路由器以AP的方式工作)
一旦你使用LUCI配置完你的无线网络以后你就可以开始配置你的AP了。
-
将你将要成为AP的路由器从你的网络中断开连接,并且用网线将其与你的电脑连接起来
-
在LUCI(的顶层目录中)中选择“Network”,进入“Interface”,选择“LAN”,选择“Edit”
-
在“IPv4 Address”中,填入你上级路由器/主路由器IP隔壁的IP(比如,如果你的上级路由器IP是192.168.1.1,那么请填入192.168.1.2)。将DNS和网关设置为指向你路由器的地址使得你的AP自身可以连接Internet。
-
向下拖动页面,选中“Ignore Interface”的复选框,它的说明是“Disable DHCP for this interface. ”
-
切换到“IPv6 Settings ”选项卡,将所有的东西都设成“disabled”。
-
在顶层目录中,选择“System”,进入“Startup”,将“firewall”,“dnsmasq”,“odhcpd”设为“disable”
-
点击“Save and Apply”的按钮。如果你失去了你的连接,请硬重启你的路由器(注:在我设置的时候,OpenWRT有一个30秒超时保护——也就是如果30s内连接不上路由器的话系统会将你的设置回滚。需要注意的是,这时候应该在回滚完以后出现的提示框中选择强制覆写设置。)
-
访问192.168.1.2(反正就是你前面设置中的地址)并且确认你LAN的设置是否正确
-
将你的上级路由器的一个LAN口与你的AP的一个LAN口相连。(已经没有必要去将你AP的WAN口与别的东西连接了。)
-
你好了
